Pokazywanie postów oznaczonych etykietą os. Pokaż wszystkie posty

wtorek, 20 listopada 2012

Ubuntu 12.10: Recovering removed files on FAT32 usb stick

Have you ever removed a file from your disk and later on regret it... I am pretty sure you did, recently it happened to one of my colleagues. The lost or should I say deleted file was a document (.docx) on a USB stick.

Unfortunately none of the free windows based utilities was able to do the job. We decided to give the linux based open source utilities a try. On the net I found two utilities (originating from one foremost) that could be used for that purpose (actually there were more but these looked the most promising):
1) scalpel
2) foremost

Both are available in the Ubuntu repos, below one can find some guidelines on installing, configuring the utilities. Before we start - few things about my environment
1) /dev/sdb1 - usb stick device
2) /tmp/recovery - the directory where the recovered files will be put into

Please keep in mind if you have automount feature turned on (which mounts automatically the device from which you would like to recover files) please ensure that you unmount it (in my opinion it is safer to do so).

Scalpel

Scalpel was the first utility that I decided to give a try. First you need to install the utility using the apt-get as follows:

# apt-get install scalpel

# dpkg -l | grep scalpel
ii  scalpel                                                     1.60-1build1                                 amd64        A Frugal, High Performance File Carver

Scalpel utility comes with a configuration file located at /etc/scalpel/scalpel.conf, the default configuration coming with the package has all file extensions commented out (not configured). Fortunately for most typical file types it has already samples so all you need is to edit and uncomment the lines for the file types you want to recover (in my case .doc):

# vim /etc/scalpel/scalpel.conf
...
doc     y       10000000  \xd0\xcf\x11\xe0\xa1\xb1\x1a\xe1\x00\x00 \xd0\xcf\x11\xe0\xa1\xb1\x1a\xe1\x00\x00 NEXT
doc     y       10000000  \xd0\xcf\x11\xe0\xa1\xb1
...

Now all you need is to launch the scalpel utility as follows:

# scalpel /dev/sdb1 -o /tmp/recovery/scalpel

Afterwards you should go to the output directory where you should be able to find the recovered files (in my case recovered files were placed in two folders doc-0-0 and doc-1-0):

# ls -l
-rw-r--r-- 1 root root      760 Nov 20 13:03 audit.txt
drwxr-xr-x 2 root root     4096 Nov 20 13:05 doc-0-0
drwxr-xr-x 2 root root     4096 Nov 20 13:06 doc-1-0
#

Unfortunately it recovered only .doc files not even a single .docx ! I tried to find a proper definition for .docx that could be placed in scalpel.conf file - I found one example on the net but it did not work in my case, I guess the definition was not correct. 

Summarizing the scalpel tool recovered the document files (.doc) very fast (2 GB usb stick) but I was not able to make it working for .docx. 

That is why I checked the second tool...

Foremost

As mentioned before the foremost utility is available in the standard Ubuntu repos so all you need is to install it using apt-get as shown below:

# apt-get install foremost

# dpkg -l | grep foremost
ii  foremost                                                    1.5.7-2                                      amd64        forensic program to recover lost files

The foremost utility has a set of predefined file formats (types) to be recovered but there is no configuration file like in scalpel. However it also makes the utility to be simpler for a first time user. 
Below you can find the command I tried - with file types doc, ole and zip.

# foremost -t doc,ole,zip -i /dev/sdb1 -o /tmp/recovery/foremost

It took a bit longer than in case of scalpel but...  After checking the output directory;

# ls -l
-rw-r--r-- 1 root root     2405 Nov 20 13:25 audit.txt
drwxr-xr-- 2 root root     4096 Nov 20 13:26 docx
drwxr-xr-- 2 root root     4096 Nov 20 13:24 ole
drwxr-xr-- 2 root root     4096 Nov 20 13:24 zip
#

Voila - in the docx directory I could find the docx files ! 


Summary

Summarizing - both tools are able to recover permanently deleted files from the filesystem (in my case FAT32). Scalpel seems to have more advanced configuration capabilities that might make it usable in advanced tasks (custom format files etc.), however one needs to perfectly know how to properly define the type, which i was not able to do for the .docx format. On the other hand if you are looking for something simple, easy and the data to files to be recovered fit into the list of standard formats (jpg,     gif, png, bmp, avi, exe, mpg, wav, riff, wmv, mov, pdf, ole, doc, zip, rar, htm, cpp) then foremost is the perfect utility for your needs.


niedziela, 16 października 2011

Linux: Sharing disks via iSCSI on Ubuntu 11.04

Recently I wanted to test a clustering solution that was based on a shared storage and I was looking for a solution that could work in my virtualized environment. One requirement was that the shared disk had to be visible as device (not a mounted NFS share). The choice went to iSCSI. There is quite interesting open source solution for providing NAS functionality (http://www.freenas.org/) but since it is based on FreeBSD 8.2 and my native system in Linux I would have to run in as another virtual machine - might be too much for my box (one FreeNAS virtual machine + two virtual machines hosting cluster - Figure 1). Therefore I searched for something that could be configured natively on my Ubuntu 11.04 box. What I found and decided to configure was the iscsitarget daemon - below you can the step by step instruction how to do that.


Figure 1 iSCSI client-server architecture


iSCSI Server configuration - Ubuntu

First of all you need to install the iscsitarget software - it is available in the standard Ubuntu repo - as below:

# apt-get install iscsitarget
Reading package lists... Done
Building dependency tree     
Reading state information... Done
Suggested packages:
  iscsitarget-source iscsitarget-dkms
Recommended packages:
  iscsitarget-module
The following NEW packages will be installed:
  iscsitarget
0 upgraded, 1 newly installed, 0 to remove and 0 not upgraded.
Need to get 78.6 kB of archives.
After this operation, 291 kB of additional disk space will be used.
Get:1 http://us.archive.ubuntu.com/ubuntu/ natty/universe iscsitarget amd64 1.4.20.2-1ubuntu1 [78.6 kB]
Fetched 78.6 kB in 0s (128 kB/s)   
Selecting previously deselected package iscsitarget.
(Reading database ... 315227 files and directories currently installed.)
Unpacking iscsitarget (from .../iscsitarget_1.4.20.2-1ubuntu1_amd64.deb) ...
Processing triggers for ureadahead ...
ureadahead will be reprofiled on next reboot
Processing triggers for man-db ...
Setting up iscsitarget (1.4.20.2-1ubuntu1) ...
 * iscsitarget not enabled in "/etc/default/iscsitarget", not starting...

Define the LUNs in the configuration file as follows (red colour marks the location of the LUNs):

# vim /etc/iet/ietd.conf
...
Target ubuntu.mediate:storage.sys1
        Lun 0 Path=/luns/storagelun0,Type=fileio,ScsiId=lun0,ScsiSN=lun0
        Lun 1 Path=/luns/storagelun1,Type=fileio,ScsiID=lun1,ScsiSN=lun

Create the files that will represent the LUNs. One can also use devices (e.g. USB stick) as placeholders for LUNs but for me files were just perfect - easy to move and control.

# cd /luns/
krychu@krystianek:/luns$ sudo dd if=/dev/zero of=storagelun0 count=0 obs=1 seek=10G
0+0 records in
0+0 records out
0 bytes (0 B) copied, 9.01e-06 s, 0.0 kB/s
krychu@krystianek:/luns$ ls -latr
total 8
drwxr-xr-x 26 root root        4096 2011-10-15 10:39 ..
-rw-r--r--  1 root root 10737418240 2011-10-15 10:40 storagelun0
drwxr-xr-x  2 root root        4096 2011-10-15 10:40 .
krychu@krystianek:/luns$ ls -lh
total 0
-rw-r--r-- 1 root root 10G 2011-10-15 10:40 storagelun0
krychu@krystianek:/luns$ sudo dd if=/dev/zero of=storagelun1 count=0 obs=1 seek=1G
0+0 records in
0+0 records out
0 bytes (0 B) copied, 1.285e-05 s, 0.0 kB/s

Next enable the iscsitarget in the default configuration file - modify the /etc/default/iscsitarget file's content so that it matches the one below:

# cat /etc/default/iscsitarget
ISCSITARGET_ENABLE=true


Start the iscsitarget service:

# service iscsitarget start
 * Starting iSCSI enterprise target service                              [ OK ]
                                                                         [ OK ]

Ok, that's it - the iSCSI should be configured to publish two LUNs (storagelun0 and storagelun1) from the /luns directory. Next step is to configure the client machines.


iSCSI Client- CentOS 6.0 on kvm

First of all check if the required software is installed: iscsi-initiator-utils (in my case it was). If it is not then install it from the standard repository as follows:

[root@localhost ~]# yum install iscsi-initiator-utils
...

Start and enable the iscsi and multipathd service during boot of the system:

[root@localhost ~]# service iscsi start
[root@localhost ~]# chkconfig --list iscsi
iscsi              0:off    1:off    2:on    3:on    4:on    5:on    6:off
[root@localhost ~]# chkconfig --list multipathd
multipathd         0:off    1:off    2:off    3:off    4:off    5:off    6:off
[root@localhost ~]# chkconfig --add multipathd
[root@localhost ~]# chkconfig --list multipathd
multipathd         0:off    1:off    2:off    3:off    4:off    5:off    6:off
[root@localhost ~]# chkconfig multipathd on
[root@localhost ~]# service multipathd start
Starting multipathd daemon:                                [  OK  ]

Now you can perform the discovery of the available iSCSI targets:

[root@localhost ~]# iscsiadm -m discovery -t st -p 192.168.122.1:3260
192.168.122.1:3260,1 ubuntu.mediate:storage.sys1
192.168.1.133:3260,1 ubuntu.mediate:storage.sys1
192.168.100.1:3260,1 ubuntu.mediate:storage.sys1
192.168.101.1:3260,1 ubuntu.mediate:storage.sys1

Next connect to the target. There two options you either specify the target (name, IP) and in that case the tooling will login to only this target or you leave it unspecified and you will be connected to all targets. In this manual I will use the first approach.

[root@localhost ~]# iscsiadm -m node -l -T ubuntu.mediate:storage.sys1 -p 192.168.122.1:3260
Logging in to [iface: default, target: ubuntu.mediate:storage.sys1, portal: 192.168.122.1,3260]
Login to [iface: default, target: ubuntu.mediate:storage.sys1, portal: 192.168.122.1,3260] successful.

Ok, now let's get to the multipath configuration. First of all copy the example configuration file to the /etc directory and restart the multipathd daemon:

[root@localhost ~]# cp /usr/share/doc/device-mapper-multipath-0.4.9/multipath.conf.synthetic /etc/
[root@localhost ~]# multipath -v2
Oct 15 11:01:38 | /lib/udev/scsi_id exitted with 1
[root@localhost ~]# multipath -ll
149455400000000006c756e31000000000000000000000000 dm-3 IET,VIRTUAL-DISK
size=1.0G features='0' hwhandler='0' wp=rw
`-+- policy='round-robin 0' prio=1 status=active
  `- 6:0:0:1 sdb 8:16  active ready  running
149455400000000006c756e30000000000000000000000000 dm-2 IET,VIRTUAL-DISK
size=10G features='0' hwhandler='0' wp=rw
`-+- policy='round-robin 0' prio=1 status=active
  `- 6:0:0:0 sda 8:0   active ready  running

[root@localhost ~]# ls -l /dev/mapper/total 0
lrwxrwxrwx 1 root root      7 Oct 15 11:01 149455400000000006c756e30000000000000000000000000 -> ../dm-2
lrwxrwxrwx 1 root root      7 Oct 15 11:01 149455400000000006c756e31000000000000000000000000 -> ../dm-3
crw-rw---- 1 root root 10, 58 Oct 15 09:52 control
lrwxrwxrwx 1 root root      7 Oct 15 09:52 vg_centos6hosta-lv_root -> ../dm-0
lrwxrwxrwx 1 root root      7 Oct 15 09:52 vg_centos6hosta-lv_swap -> ../dm-1

Ok, now let us configure the multipath daemon so that the device is always available as an alias (e.g. ha-mediate under /dev/mapper/ha-mediate). Add the following section to the /etc/multipath.conf file and restart the multipathd daemon:

[root@localhost ~]# cat /etc/multipath.conf
##
## This is a template multipath-tools configuration file
## Uncomment the lines relevent to your environment
##
multipaths {
    multipath {
        wwid            149455400000000006c756e30000000000000000000000000
        alias            ha-mediate
        path_grouping_policy    multibus
        path_selector        "round-robin 0"
        failback        manual
        rr_weight        priorities
        no_path_retry        5
        rr_min_io        100
    }
}

[root@localhost ~]# service multipathd restart
Stopping multipathd daemon:                                [  OK  ]
Starting multipathd daemon:                                [  OK  ]
[root@localhost ~]# multipath -ll
149455400000000006c756e31000000000000000000000000 dm-3 IET,VIRTUAL-DISK
size=1.0G features='0' hwhandler='0' wp=rw
`-+- policy='round-robin 0' prio=1 status=active
  `- 6:0:0:1 sdb 8:16  active ready  running
ha-mediate (149455400000000006c756e30000000000000000000000000) dm-2 IET,VIRTUAL-DISK
size=10G features='1 queue_if_no_path' hwhandler='0' wp=rw
`-+- policy='round-robin 0' prio=1 status=active
  `- 6:0:0:0 sda 8:0   active ready  running
[root@localhost ~]# ls -l /dev/mapper/
total 0
lrwxrwxrwx 1 root root      7 Oct 15 11:05 149455400000000006c756e31000000000000000000000000 -> ../dm-3
crw-rw---- 1 root root 10, 58 Oct 15 09:52 control
lrwxrwxrwx 1 root root      7 Oct 15 11:05 ha-mediate -> ../dm-2
lrwxrwxrwx 1 root root      7 Oct 15 09:52 vg_centos6hosta-lv_root -> ../dm-0
lrwxrwxrwx 1 root root      7 Oct 15 09:52 vg_centos6hosta-lv_swap -> ../dm-1

As you see now the device is available under it's alias - in my case ha-mediate. So that's it - now you can create a filesystem on a device, mount it and start using it ;)

If you mount the iSCSI target only from one server you can create a cluster unaware filesystem like etx3, ext4 (example below). However for granting access from multiple servers a cluster-aware filesystem has to be created.

[root@localhost ~]# mkfs.ext4 /dev/mapper/ha-mediate
mke2fs 1.41.12 (17-May-2010)
Filesystem label=
OS type: Linux
Block size=4096 (log=2)
Fragment size=4096 (log=2)
Stride=0 blocks, Stripe width=0 blocks
655360 inodes, 2621440 blocks
131072 blocks (5.00%) reserved for the super user
First data block=0
Maximum filesystem blocks=2684354560
80 block groups
32768 blocks per group, 32768 fragments per group
8192 inodes per group
Superblock backups stored on blocks:
    32768, 98304, 163840, 229376, 294912, 819200, 884736, 1605632

Writing inode tables: done                           
Creating journal (32768 blocks): done
Writing superblocks and filesystem accounting information: done

This filesystem will be automatically checked every 34 mounts or
180 days, whichever comes first.  Use tune2fs -c or -i to override.
[root@localhost ~]# mkdir /mnt/tmp
[root@localhost ~]# mount /dev/mapper/ha-mediate /mnt/tmp/
[root@localhost ~]# ls -l /mnt/tmp/
total 16
drwx------ 2 root root 16384 Oct 15 11:06 lost+found

niedziela, 11 września 2011

Linux: Configuring cluster VIP (Virtual IP) with keepalived: Part 2

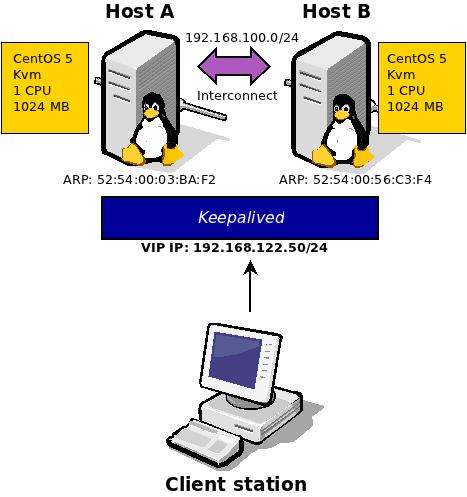
The first part of this article is focusing on the instructions/guide how to setup keepalived with VIP address for a two node configuration. I have enhanced the picture from the previous article with the ARP configuration since the ARPs will be used throughout this part to describe the mechanisms for VIP failover.

Figure 1 Deployment diagram of the keepalived for a two node configuration

In this part there will be two test scenarios described:
  1. The master goes down (Host A)
  2. The master starts up again (Host A)
Other cases involving Backup node (Host B) are not relevant to be described in detail since in these cases there is no VIP failover done.

Case A The master goes down (Host A)

Let's first check how the envrionment looks like from the client station perspective. Both nodes (HostA and HostB) are up and running with the keepalived as described in part 1 or this article. The client station is able to ping the VIP address:

krychu@krystianek:~$ ping 192.168.122.50
PING 192.168.122.50 (192.168.122.50) 56(84) bytes of data.
64 bytes from 192.168.122.50: icmp_req=1 ttl=64 time=0.394 ms
64 bytes from 192.168.122.50: icmp_req=2 ttl=64 time=0.353 ms
64 bytes from 192.168.122.50: icmp_req=3 ttl=64 time=0.270 ms
64 bytes from 192.168.122.50: icmp_req=4 ttl=64 time=0.814 ms
^C
--- 192.168.122.50 ping statistics ---
4 packets transmitted, 4 received, 0% packet loss, time 2998ms
rtt min/avg/max/mdev = 0.270/0.457/0.814/0.212 ms

By looking into the arp table:

krychu@krystianek:~$ arp -an
...
? (192.168.122.50) at 52:54:00:03:ba:f2 [ether] on virbr0? (192.168.122.179) at on virbr0
...

we see that the Host A is the one available under the VIP (192.168.122.50) address, which is as we expected it to be since this is the master.
Now let's simulate a crash of the master node as follows:
  1. We constantly ping the VIP address from the client station
  2. We simulate a crash of the keepalived process on the master node (Host A), e.g. kill -9
  3. We check ping output if there was a smooth failover
  4. We check the ARP table which MAC is used
  5. We sniff the interface to get the information what caused the client's machine ARP table update
Ok, so what are the results? First of all the node crash does have effect on ICMP packets being dropped - there is a small increase in the response time to about 20.1 ms (please take a look below). 

krychu@krystianek:~$ ping 192.168.122.50
PING 192.168.122.50 (192.168.122.50) 56(84) bytes of data.
...
64 bytes from 192.168.122.50: icmp_req=37 ttl=64 time=0.336 ms
64 bytes from 192.168.122.50: icmp_req=38 ttl=64 time=0.398 ms
64 bytes from 192.168.122.50: icmp_req=39 ttl=64 time=0.273 ms
64 bytes from 192.168.122.50: icmp_req=40 ttl=64 time=0.298 ms
64 bytes from 192.168.122.50: icmp_req=41 ttl=64 time=20.1 ms
64 bytes from 192.168.122.50: icmp_req=42 ttl=64 time=0.320 ms
64 bytes from 192.168.122.50: icmp_req=43 ttl=64 time=0.379 ms
64 bytes from 192.168.122.50: icmp_req=44 ttl=64 time=0.314 ms
...
^C
--- 192.168.122.50 ping statistics ---
67 packets transmitted, 67 received, 0% packet loss, time 65997ms
rtt min/avg/max/mdev = 0.198/0.742/20.167/2.472 ms

The proof that the failover has happened can be found in the ARP table - which now has the assignment for the VIP address to the HostB's MAC (previousle Backup keepalived server).

krychu@krystianek:~$ arp -an
...
? (192.168.122.50) at 52:54:00:56:c3:f4 [ether] on virbr0
...

In the wireshark we see that the backup node (HostB) has sent the Gratuitous ARP message to a broadcast MAC announcing that he is the one owning now the VIP address. Afterwards the client station has updated it's ARP cache table.
If we check the keepalived logs on the HostB one can see that after the crash of the HostA has been detected the keepalived is transitioning from the BACKUP to MASTER state:

Sep 11 09:50:49 centOS-hostB Keepalived_vrrp: Using LinkWatch kernel netlink reflector...
Sep 11 09:50:49 centOS-hostB Keepalived_vrrp: VRRP_Instance(VI_1) Entering BACKUP STATE
Sep 11 09:50:49 centOS-hostB Keepalived_vrrp: VRRP sockpool: [ifindex(2), proto(112), fd(10,11)]
Sep 11 10:55:04 centOS-hostB Keepalived_vrrp: VRRP_Instance(VI_1) Transition to MASTER STATE
Sep 11 10:55:05 centOS-hostB Keepalived_vrrp: VRRP_Instance(VI_1) Entering MASTER STATE
Sep 11 10:55:05 centOS-hostB Keepalived_vrrp: VRRP_Instance(VI_1) setting protocol VIPs.
Sep 11 10:55:05 centOS-hostB Keepalived_vrrp: VRRP_Instance(VI_1) Sending gratuitous ARPs on eth1 for 192.168.122.50
Sep 11 10:55:10 centOS-hostB Keepalived_vrrp: VRRP_Instance(VI_1) Sending gratuitous ARPs on eth1 for 192.168.122.50
Sep 11 10:55:45 centOS-hostB Keepalived_vrrp: VRRP_Instance(VI_1) Received higher prio advert
Sep 11 10:55:45 centOS-hostB Keepalived_vrrp: VRRP_Instance(VI_1) Entering BACKUP STATE
Sep 11 10:55:45 centOS-hostB Keepalived_vrrp: VRRP_Instance(VI_1) removing protocol VIPs.
Sep 11 10:58:35 centOS-hostB Keepalived_vrrp: VRRP_Instance(VI_1) Transition to MASTER STATE
Sep 11 10:58:36 centOS-hostB Keepalived_vrrp: VRRP_Instance(VI_1) Entering MASTER STATE
Sep 11 10:58:36 centOS-hostB Keepalived_vrrp: VRRP_Instance(VI_1) setting protocol VIPs.
Sep 11 10:58:36 centOS-hostB Keepalived_vrrp: VRRP_Instance(VI_1) Sending gratuitous ARPs on eth1 for 192.168.122.50
Sep 11 10:58:41 centOS-hostB Keepalived_vrrp: VRRP_Instance(VI_1) Sending gratuitous ARPs on eth1 for 192.168.122.50
Sep 11 11:32:40 centOS-hostB Keepalived_vrrp: VRRP_Instance(VI_1) Received higher prio advert
Sep 11 11:32:40 centOS-hostB Keepalived_vrrp: VRRP_Instance(VI_1) Entering BACKUP STATE
Sep 11 11:32:40 centOS-hostB Keepalived_vrrp: VRRP_Instance(VI_1) removing protocol VIPs.
Sep 11 11:39:54 centOS-hostB Keepalived_vrrp: VRRP_Instance(VI_1) Transition to MASTER STATE
Sep 11 11:39:55 centOS-hostB Keepalived_vrrp: VRRP_Instance(VI_1) Entering MASTER STATE
Sep 11 11:39:55 centOS-hostB Keepalived_vrrp: VRRP_Instance(VI_1) setting protocol VIPs.
Sep 11 11:39:55 centOS-hostB Keepalived_vrrp: VRRP_Instance(VI_1) Sending gratuitous ARPs on eth1 for 192.168.122.50
Sep 11 11:40:00 centOS-hostB Keepalived_vrrp: VRRP_Instance(VI_1) Sending gratuitous ARPs on eth1 for 192.168.122.50


Case B The master is back (Host A)

Now let's focus on the situation when the Host A is brought back after a crash. Just as a reminder the situation is that after a crash HostB took over the Master role, owns the VIP address and the client station has an association to HostB's MAC in its ARP table.
The methodology is similar as in Case A:
  1. We constantly ping the VIP address from the client station
  2. We start the keepalived on the HostA
  3. We check ping output if there was a smooth failover
  4. We check the ARP table which MAC is used
  5. We sniff the interface to get the information what caused the client's machine ARP table update
After issuing step 1 and 2 we see again an increase in the response time in the ICMP traffic but much smaller than in case of the crash.

krychu@krystianek:~$ ping 192.168.122.50
PING 192.168.122.50 (192.168.122.50) 56(84) bytes of data.
...
64 bytes from 192.168.122.50: icmp_req=23 ttl=64 time=0.191 ms
64 bytes from 192.168.122.50: icmp_req=24 ttl=64 time=0.346 ms
64 bytes from 192.168.122.50: icmp_req=25 ttl=64 time=0.331 ms
64 bytes from 192.168.122.50: icmp_req=26 ttl=64 time=0.291 ms
64 bytes from 192.168.122.50: icmp_req=27 ttl=64 time=2.53 ms
64 bytes from 192.168.122.50: icmp_req=28 ttl=64 time=0.315 ms
64 bytes from 192.168.122.50: icmp_req=29 ttl=64 time=0.338 ms
...

However it is still not a proof that a failover actually has happened. Let's take a look at the client station's ARP table:

krychu@krystianek:~$ arp -an
...
? (192.168.122.50) at 52:54:00:03:ba:f2 [ether] on virbr0
...

We see that the original mapping (presented in case A), which was pointing to HostB's MAC now points to HostA's. Which indicates the VIP address is now owned by the HostA again. In the wireshark we again see the Gratuitous ARP message to a broadcast MAC announcing sent by the HostA. On this basis the client station has updated it's ARP cache table.

In the logs on HostB one can find the information that after startup of HostA keepalived on HostB is transitioning to BACKUP state since it has received an announcement with a higher priority (review the configuration files from part 1)

Sep 11 10:55:45 centOS-hostB Keepalived_vrrp: VRRP_Instance(VI_1) Entering BACKUP STATE
Sep 11 10:55:45 centOS-hostB Keepalived_vrrp: VRRP_Instance(VI_1) removing protocol VIPs.
Sep 11 10:58:35 centOS-hostB Keepalived_vrrp: VRRP_Instance(VI_1) Transition to MASTER STATE
Sep 11 10:58:36 centOS-hostB Keepalived_vrrp: VRRP_Instance(VI_1) Entering MASTER STATE
Sep 11 10:58:36 centOS-hostB Keepalived_vrrp: VRRP_Instance(VI_1) setting protocol VIPs.
Sep 11 10:58:36 centOS-hostB Keepalived_vrrp: VRRP_Instance(VI_1) Sending gratuitous ARPs on eth1 for 192.168.122.50
Sep 11 10:58:41 centOS-hostB Keepalived_vrrp: VRRP_Instance(VI_1) Sending gratuitous ARPs on eth1 for 192.168.122.50
Sep 11 11:32:40 centOS-hostB Keepalived_vrrp: VRRP_Instance(VI_1) Received higher prio advert
Sep 11 11:32:40 centOS-hostB Keepalived_vrrp: VRRP_Instance(VI_1) Entering BACKUP STATE
Sep 11 11:32:40 centOS-hostB Keepalived_vrrp: VRRP_Instance(VI_1) removing protocol VIPs.
Sep 11 11:39:54 centOS-hostB Keepalived_vrrp: VRRP_Instance(VI_1) Transition to MASTER STATE
Sep 11 11:39:55 centOS-hostB Keepalived_vrrp: VRRP_Instance(VI_1) Entering MASTER STATE
Sep 11 11:39:55 centOS-hostB Keepalived_vrrp: VRRP_Instance(VI_1) setting protocol VIPs.
Sep 11 11:39:55 centOS-hostB Keepalived_vrrp: VRRP_Instance(VI_1) Sending gratuitous ARPs on eth1 for 192.168.122.50
Sep 11 11:40:00 centOS-hostB Keepalived_vrrp: VRRP_Instance(VI_1) Sending gratuitous ARPs on eth1 for 192.168.122.50
Sep 11 11:57:32 centOS-hostB Keepalived_vrrp: VRRP_Instance(VI_1) Received higher prio advert
Sep 11 11:57:32 centOS-hostB Keepalived_vrrp: VRRP_Instance(VI_1) Entering BACKUP STATE
Sep 11 11:57:32 centOS-hostB Keepalived_vrrp: VRRP_Instance(VI_1) removing protocol VIPs.

Summary

I hope that this exercise gave you a good understaning of the mechanisms controlling the VIP address failover in the keepalived and also some practical knowledge about how to setup such a test environment. For me this activity has been a great experience and fun. I think also it is a good base for further research - about the failure detection mechanisms (happening on the interconnect interface) and providing the application (e.g. HAProxy) on top of keepalived. 

Just to summarize the VIP address failover is controlled by a special ARP message (Gratuitous ARP) which has to be accepted and processed by the client station. By processing I mean that the client's station's ARP table mapping have to be updated accordingly.

From the software perspective - the keepalived daemon allows to configure the VIP failover groups and  assign MASTER, BACKUP roles for hosts within such a group. There is also a failure detection available which works fast (for a genuine keepalived configuration it was not higher than 20 ms) and controls the VIP address ownership.

Linux: Configuring cluster VIP (Virtual IP) with keepalived: Part 1

Some time ago I had a discussion about open source load balancing solutions (e.g. HAProxy)  especially with the focus on HA and VIP address failover (by VIP address failover we meant that the public IP is moved to the second node in case the first one is shutdown). It came to me that I have never in practice done that and I decided to built up such a solution - just to check the second point, namely the VIP address failover. For that I used my Ubuntu box together with two virtualized environments based on CentOS (these I had already available in kvm) - the configuration is shown on the picture below:

+
Figure 1 Network deployment of the test environment for
the keepalived's VIP failover
Ok, having the picture in mind let's get to work.

Test envrionment setup

The presented below points show how to configure it:
  1. Define additional Interconnect network. For doing that I used the virt-manager GUI: Edit->Connection Details and there should a window appear (just as the one presented on the Figure 2). In the Virtual Networks tab you should add a new network (a '+' button in the bottom of the window)
    Figure 2 Interconnect virtual network
  2. Install two machines (Host A and B) that will be hosting the keepalived. I already had one CentOS kvm which I cloned to have the Host B (using virt-manager it is very simple and can be done via main GUI)
  3. Install keepalived. CentOS does not have the keepalived in its repos so I had to download the latest sources from the web: http://www.keepalived.org/software/keepalived-1.2.2.tar.gz. After unpacking I did not have to download any additional dependencies and I just followed the INSTALL instructions - as usual steps: configure, make, make install ;) In order to build the keepalived only once (for two hosts) you might also install it before cloning the image (after the image has been cloned it has the keepalived).
  4. Configure sysctl. In the manual I read that one should enhance the sysctl configuration in order to allow the application to bind to non local addresses - add these line to /etc/sysctl.conf:
     net.ipv4.ip_nonlocal_bind = 1
    and execute:
     sysctl -p
  5. Reconfigure firewall. The keepalived utilizes multicast address (224.0.0.18) for exchanging information about the status of the nodes belonging to specific groups. What needs to be done is to allow the multicast traffic to go over the Interconnect network (eth0) interface. In my case for testing purposes I have just disabled the firewall (in Gnome: System->Administration->Security Level and Firewall)
  6. Configure the master host (Host A). One needs to adapt or create the /etc/keepalived/keepalived.conf file as follows:
    [root@localhost ~]# cat /etc/keepalived/keepalived.conf
    vrrp_instance VI_1 {
    state MASTER
    interface eth0
    virtual_router_id 51
    priority 102
    virtual_ipaddress {
    192.168.122.50/24 brd 192.168.122.255 dev eth1 label eth1:0
    }
    }

    where eth0 is the interface for interconnect and eth1 is the interface for communication with external world (VIP)
  7. Configure the backup host (Host B). The configuration file /etc/keepalived/keepalived.conf would be mostly the same for both hosts (as for host A) - what one has to remember is to set the Host B into backup mode with lower priority
    [root@centos1-priv ~]# cat /etc/keepalived/keepalived.conf
    vrrp_instance VI_1 {
    state BACKUP
    interface eth0
    virtual_router_id 51
    priority 101
    virtual_ipaddress {
    192.168.122.50/24 brd 192.168.122.255 dev eth1 label eth1:0
    }
    }

    where eth0 is the interface for interconnect and eth1 is the interface for communication with external world (VIP)

  8. Startup keepalived on both hosts. The best way to start the keepalived is to use the init/startup scripts provided with the source package
    # /etc/init.d/keepalived start
    If you cannot find the script you can get it from the keepalived source package
  9. Proceed to the test (see Part 2)

sobota, 27 sierpnia 2011

Ubuntu: Nokia E52 as 3G modem on Natty 11.04 box

Last week I had some problems with the signal strength of the default 3G modem delivered by the operator (which appeared to be Huawei Technologies Co., Ltd. E220 HSDPA Modem / E270 HSDPA/HSUPA Modem) together with the so called Blueconnect offer (offered by the polish T-Mobile former ERA) while the signal strength on my mobile phone Nokia E52 seemed to be perfect. That is why I decided to try to connect with the Blueconnect using my mobile. The idea was to connect the phone to the laptop using the bluetooth and toward the radio network via 3G/GSM.


First of all I did a reference speed measurement on the using the original Huwaei modem (http://www.speedtest.net/) - the results are presented below:

 
Ok, as soon as I had the results I switch the card to my Nokia E52 mobile and started to configure the bluetooth connection. On Gnome there is a wizard for managing the bluetooth devices – it can be found System->Preferences->Bluetooth or as in my case if you are using gnome-do just type bluetooth in the gnome-do window and just follow the instructions as on the screenshots below (please remember to enable the DUN):


 Last but not least I did the bandwidth check and the results are slightly better than in case of Huawei modem but the most important is that the signal strength is more stable than before. The measurements were done at polish seaside (Gaski - 54.241018,15.892321)

niedziela, 20 lutego 2011

WinXP: Change drive letter assigments

Today I had a problem with the letters that were assigned to disks. I bought a new disc, copied under Knoppix the content of the old disc to the new one, booted from the new one - however the old disc still had letter C assigned and the new one D. Moreover it was not possible to change the assignments via GUI (Control Panel -> Administrative Tools -> Disc Management).

Fortunately I found a way to succed -> namely via registry update. It seems that WinXP stores the assignments in the special place in the registry. One can easily modify it by using the regedit utility and modify the keys as shown on the attached picture (HKEY_LOCAL_MACHINE\SYSTEM\MountedDevices)
Exact procedure (D is the boot drive on C the pagefile is located) is as follows:
1. Do a full backup of the registry
2. Run the regedit and go to the HKEY_LOCAL_MACHINE\SYSTEM\MountedDevices
3. Rename the \DosDevices\C: to something like \DosDevices\Z:
4. Rename the \DosDevices\D: to \DosDevices\C:
5. Rename the \DosDevices\Z: to \DosDevices\D:
6. Exit regedit and reboot the system
It worked in my case!

niedziela, 12 września 2010

Solaris 10 u9 - jumpstart flash installation

  1. Creating flash archive

  2. For creating the flar archive for the root filesystem one should reboot the system into single user mode or if not possible disable as much application as possible (to avoid changes on the filesystem done during archive creation). The command below create the flar archive in the /export/flash directory. The archive is to be compressed (-c), without /export/flash directory (-x):

    # mkdir /export/flash
    # cd /export/flash
    # flarcreate -n flash_all -c -R / -x /export/flash inst_x86


  3. Copy flar image to the jumpstart server
  4. Configuring jumpstart

  5. The initial configuration of the jumpstart server has been described in my previous post. The only configuration change is referred to the profile:

    # cat x86-class
    install_type flash_install
    archive_location nfs 192.168.1.135:/export/home/install/flash/inst_x86
    partitioning explicit
    filesys mirror c1t0d0s0 c1t1d0s0 5120 /
    filesys mirror c1t0d0s1 c1t1d0s1 2048 swap
    filesys mirror c1t0d0s4 c1t1d0s4 6656 /var
    filesys mirror c1t0d0s5 c1t1d0s5 6656 /usr
    filesys mirror c1t0d0s6 c1t1d0s6 10240 /export
    filesys mirror c1t0d0s7 c1t1d0s7 free /u01
    metadb c1t0d0s3 count 5
    metadb c1t1d0s3 count 5


    Please double check if the flar archive directory is available via NFS otherwise the client will not be able to access it during jumpstart installation.

  6. Start the client machine
Now the automatic installation from the flar archive should be started. As far as the time is concerned - in my case it took about 30 minutes for the same installation as in the jumpstart article and 30 minutes for creating the archive. I will summarize both methods in separate article - right now I have to go to sleep ;)

Solaris 10 u9 Jumpstart

I had to do some investigation on installation procedures for installation of Solaris 10 on multiple machines and therefore wanted to refresh my knowledge on jumpstart and flash installation procedures. Since I do not own too much hardware to be sacrifaced for such experiments I decided to use virtualized one.


  1. Installation of virtualized jumpstart server - using standard installation from DVD using Core installation. In order to setup the jumpstart server one needs to install following additional packages:

    • bash (SUNWbash)

    • zsh (SUNWzsh)

    • java (SUNWj5rt, SUNWj6rt)

    • man+doc (SUNWdoc,SUNWman)

    • dhcp server (SUNWdhcsu, SUNWdhcsr, SUNWdhcm - optional)

    • install software e.g. chkprobe (SUNWinst)

  2. Mount installation DVD - in my case the cdrom was available as c0t0d0s0 and I mounted it under /cdrom (previously created) using:

  3. # mount -F hsfs -o ro /dev/dsk/c0t0d0s0 /cdrom

  4. Setup install server

  5. #cd /cdrom/Solaris_10/Tools
    #./setup_install_server /export/home/install


  6. Add client machine for installation


  7. Now you need to add client definition:

    # cd /export/home/install/Solaris_10/Tools
    # ./add_install_client \
    -d \
    -e 00:0c:29:04:b8:63 \
    -s 192.168.1.135:/export/home/install \
    -c 192.168.1.135:/export/home/config \
    -p 192.168.1.135:/export/home/config/ i86pc


    Very important is to leave the path to the sysidcfg without the file itself (last parameter) - otherwise it will not be used during jumpstart. Of course you need to adapt the IP addresses and MAC address of the client machine to your needs.
    It is important to store the info that will have to be used for the boot configuration:

    Boot server IP (BootSrvA) : 192.168.1.135
    Boot file (BootFile) : 01000c2904b863


  8. Set up sysidcfg

  9. Create the sysidcfg file for the client. Below I enclose the content of my file - the most important is the new property introduced in the Solaris 10 update 9: auto_reg. On the basis of this property the decision will be made if to send registration info to Oracle about the product and the user. I decided to completely disable this feature.

    # cd /export/home/config
    # cat sysidcfg
    keyboard=US-English
    nfs4_domain=dynamic
    system_locale=en_US.ISO8859-1
    timezone=US/Pacific
    timeserver=localhost
    terminal=vt100
    name_service=NONE
    security_policy=NONE
    service_profile=limited_net
    root_password=
    network_interface=e1000g0 { dhcp
    protocol_ipv6=yes
    }
    auto_reg=disable

  10. Configure DHCP

  11. Set up the DHCP server:
    # dhcpconfig -D -r SUNWfiles -p /var/dhcp
    Created DHCP configuration file.
    Created dhcptab.
    Added "Locale" macro to dhcptab.
    Added server macro to dhcptab - voyin.
    DHCP server started.
    # svcs dhcp-server
    STATE STIME FMRI
    online 14:16:10 svc:/network/dhcp-server:default

    Enable the PXE boot:
    # dhtadm -A -m 01000c2904b863 -d ':BootFile="01000c2904b863":BootSrvA=192.168.1.135:'

    Configure the static IP address to be assigned to the client machines:
    # pntadm -C 192.168.1.0
    # pntadm -A 192.168.1.45 \
    > -f PERMANENT \
    > -i 01000c2904b863 \
    > -m 01000c2904b863 \
    > -s 192.168.1.135 \
    > 192.168.1.0
    # pntadm -P 192.168.1.0
    Client ID Flags Client IP Server IP Lease Expiration Macro Comment
    01000C2904B863 00 192.168.1.45 192.168.1.135 09/12/2010


  12. Configure NFS

  13. You need also to share the direcotries with the configuration and installation packages via NFS so that all these will be available to the client machines during jumpstart installation:

    # vi /etc/dfs/dfstab
    ..
    share -F nfs -o ro,anon=0 /export/home/install
    share -F nfs -o ro,anon=0 /export/home/config
    # shareall
    # share
    - /export/home/install ro,anon=0 ""
    - /export/home/config ro,anon=0 ""

  14. Fine tune settings for GRUB

  15. The grub menu for client machines can be found in the/tftpboot/menu.lst.. In order to make the installation fully automatic one needs to add the install keyword to the kernel line. Additionally I have provided nowin option which indicates that the installation should be done in text mode. Below you can find the content of my grub menu file:

    default=0
    timeout=5
    min_mem64 1024
    title Solaris_10 Jumpstart
    kernel$ /I86PC.Solaris_10-1/multiboot kernel/$ISADIR/unix install nowin -B install_config=192.168.1.135:/export/home/config,sysid_config=192.168.1.135:/export/home/config/,install_media=192.168.1.135:/export/home/install,install_boot=192.168.1.135:/export/home/install/boot
    module$ /I86PC.Solaris_10-1/$ISADIR/x86.miniroot


  16. Configure rules & profile

  17. Now you need to specify the rules for the client machines. I decided to define only one general rule for x86 systems. The type of installation is initial with explicit partitioning (own mirrors defined). The set of packages to be installed is SUNWCuser (End User System Support).

    # cd /export/home/config
    # cat rules
    any - - x86-class -
    # cat x86-class
    #
    # Sample profile for an x86 machine. Installation will
    # provide default partitioning on a standalone system
    # with the end-user cluster.
    #
    # "@(#)x86-class 1.2 94/01/25"
    #
    install_type initial_install
    system_type standalone
    partitioning explicit
    filesys mirror c1t0d0s0 c1t1d0s0 5120 /
    filesys mirror c1t0d0s1 c1t1d0s1 2048 swap
    filesys mirror c1t0d0s4 c1t1d0s4 6656 /var
    filesys mirror c1t0d0s5 c1t1d0s5 6656 /usr
    filesys mirror c1t0d0s6 c1t1d0s6 10240 /export
    filesys mirror c1t0d0s7 c1t1d0s7 free /u01
    metadb c1t0d0s3 count 5
    metadb c1t1d0s3 count 5
    cluster SUNWCuser
    # cp /export/home/install/Solaris_10/Misc/jumpstart_sample/check .
    # ./check
    Validating rules...
    Validating profile x86-class...
    The custom JumpStart configuration is ok.


  18. Boot client machine

Boot the client machine via PXE and the jumpstart installation will begin. In my case in the virtualized environment (destination was also a virtual image) the installation took about 30 minutes (full installation of Solaris 10 update 9 without any additional patches).