Recently I needed to have a client application for a GTP' external system. I did some research on the web but unfortunately did not find anything usable for me (found one java library on kenai.com but the implementation is in very early phase, the other was open-cgf written in Erlang for which I found two obstacles the language + crash dumps when it was starting up on my Ubuntu Natty 64-bit box). Having some development background from the past and having a look on the 3GPP 32.295 specification I decided that it is not a big amount of effort to implement it. I think this is a good opportunity to learn the protocol and additionally check the JBoss Netty framework - which seems to be a perfect match for such a solution. Indeed writing a client/server application using JBoss Netty is pretty straightforward (I will try to provide more details in another article) - it mainly about writing proper encoder/decoder and handlers.
The outcome can be found in the google code under the link: http://code.google.com/p/gtpprime/.
poniedziałek, 31 października 2011
niedziela, 16 października 2011
Linux: Creating encrypted partition using cryptsetup
In order to protect sensitive data in case your storage is lost or stolen, one usually encrypts the drive using trusted/safe encryption algorithms. Under Linux one can use e.g. cryptsetup - available in standard Ubuntu repository (I guess for other distros it should be also available in standard repos). Since it works on the block level, one can mix unencrypted partitions with encrypted ones. It also used in most of the distros (e.g. Ubuntu alternate installer) as a tooling providing disk encryption.
Creating/mounting encrypted partition
First of all I did not want to experiment with my HDD and decided to use the USB stick for this experiment. One needs to partition the disk - I created two partitions sdb1 and sdb2 using the fdisk. The partition table has been presented below:
Disk /dev/sdb: 4156 MB, 4156555264 bytes
255 heads, 63 sectors/track, 505 cylinders
Units = cylinders of 16065 * 512 = 8225280 bytes
Sector size (logical/physical): 512 bytes / 512 bytes
I/O size (minimum/optimal): 512 bytes / 512 bytes
Disk identifier: 0x000e56eb
Device Boot Start End Blocks Id System
/dev/sdb1 1 132 1060258+ 83 Linux
/dev/sdb2 133 505 2996122+ 83 Linux
Now you need to format the partition as shown below (I used the 256-bit key length for encryption). Please type the uppercase 'YES' as prompted below. Also you will have to provide the encryption password.
root@krystianek:~# cryptsetup --verbose --key-size 256 luksFormat /dev/sdb2
WARNING!
========
This will overwrite data on /dev/sdb2 irrevocably.
Are you sure? (Type uppercase yes): YES
Enter LUKS passphrase:
Verify passphrase:
Command successful.
That's it now you can open the encrypted partition. As a parameter you will provide the alias to which the device will be mapped as presented below:
root@krystianek:~# cryptsetup --verbose luksOpen /dev/sdb2 usbencrypted
Enter passphrase for /dev/sdb2:
Key slot 0 unlocked.
Command successful.
Next you can create the filesystem - I created the ext4 and mounted it under /mnt/hd1:
Now you can start copying files to that filesystem.
Unmounting/closing the encrypted partition
In order unmount and close the encrypted partition one needs to:
Next time when you attach the usb stick you should be automatically prompted for password.
Creating/mounting encrypted partition
First of all I did not want to experiment with my HDD and decided to use the USB stick for this experiment. One needs to partition the disk - I created two partitions sdb1 and sdb2 using the fdisk. The partition table has been presented below:
root@krystianek:~# fdisk -l /dev/sdb
Disk /dev/sdb: 4156 MB, 4156555264 bytes
255 heads, 63 sectors/track, 505 cylinders
Units = cylinders of 16065 * 512 = 8225280 bytes
Sector size (logical/physical): 512 bytes / 512 bytes
I/O size (minimum/optimal): 512 bytes / 512 bytes
Disk identifier: 0x000e56eb
Device Boot Start End Blocks Id System
/dev/sdb1 1 132 1060258+ 83 Linux
/dev/sdb2 133 505 2996122+ 83 Linux
Now you need to format the partition as shown below (I used the 256-bit key length for encryption). Please type the uppercase 'YES' as prompted below. Also you will have to provide the encryption password.
root@krystianek:~# cryptsetup --verbose --key-size 256 luksFormat /dev/sdb2
WARNING!
========
This will overwrite data on /dev/sdb2 irrevocably.
Are you sure? (Type uppercase yes): YES
Enter LUKS passphrase:
Verify passphrase:
Command successful.
That's it now you can open the encrypted partition. As a parameter you will provide the alias to which the device will be mapped as presented below:
root@krystianek:~# cryptsetup --verbose luksOpen /dev/sdb2 usbencrypted
Enter passphrase for /dev/sdb2:
Key slot 0 unlocked.
Command successful.
root@krystianek:~# ls -l /dev/mapper/usbencrypted
lrwxrwxrwx 1 root root 7 2011-10-16 20:06 /dev/mapper/usbencrypted -> ../dm-3
lrwxrwxrwx 1 root root 7 2011-10-16 20:06 /dev/mapper/usbencrypted -> ../dm-3
root@krystianek:~# cryptsetup status usbencrypted
/dev/mapper/usbencrypted is active:
cipher: aes-cbc-essiv:sha256
keysize: 256 bits
device: /dev/sdb2
offset: 2056 sectors
size: 5990189 sectors
mode: read/write
/dev/mapper/usbencrypted is active:
cipher: aes-cbc-essiv:sha256
keysize: 256 bits
device: /dev/sdb2
offset: 2056 sectors
size: 5990189 sectors
mode: read/write
Next you can create the filesystem - I created the ext4 and mounted it under /mnt/hd1:
root@krystianek:~# mkfs.ext4 /dev/mapper/usbencrypted
mke2fs 1.41.14 (22-Dec-2010)
Filesystem label=
OS type: Linux
Block size=4096 (log=2)
Fragment size=4096 (log=2)
Stride=0 blocks, Stripe width=0 blocks
187312 inodes, 748773 blocks
37438 blocks (5.00%) reserved for the super user
First data block=0
Maximum filesystem blocks=767557632
23 block groups
32768 blocks per group, 32768 fragments per group
8144 inodes per group
Superblock backups stored on blocks:
32768, 98304, 163840, 229376, 294912
Writing inode tables: done
Creating journal (16384 blocks): done
Writing superblocks and filesystem accounting information: done
This filesystem will be automatically checked every 34 mounts or
180 days, whichever comes first. Use tune2fs -c or -i to override.
root@krystianek:~# mount /dev/mapper/usbencrypted /mnt/hd1/
root@krystianek:~# ls -l /mnt/hd1/
total 16
drwx------ 2 root root 16384 2011-10-16 20:12 lost+found
Now you can start copying files to that filesystem.
Unmounting/closing the encrypted partition
In order unmount and close the encrypted partition one needs to:
root@krystianek:~# umount /mnt/hd1/
root@krystianek:~# cryptsetup --verbose luksClose usbencrypted
Command successful.
Command successful.
Next time when you attach the usb stick you should be automatically prompted for password.
Linux: Sharing disks via iSCSI on Ubuntu 11.04
Recently I wanted to test a clustering solution that was based on a shared storage and I was looking for a solution that could work in my virtualized environment. One requirement was that the shared disk had to be visible as device (not a mounted NFS share). The choice went to iSCSI. There is quite interesting open source solution for providing NAS functionality (http://www.freenas.org/) but since it is based on FreeBSD 8.2 and my native system in Linux I would have to run in as another virtual machine - might be too much for my box (one FreeNAS virtual machine + two virtual machines hosting cluster - Figure 1). Therefore I searched for something that could be configured natively on my Ubuntu 11.04 box. What I found and decided to configure was the iscsitarget daemon - below you can the step by step instruction how to do that.
iSCSI Server configuration - Ubuntu
First of all you need to install the iscsitarget software - it is available in the standard Ubuntu repo - as below:
Define the LUNs in the configuration file as follows (red colour marks the location of the LUNs):
Create the files that will represent the LUNs. One can also use devices (e.g. USB stick) as placeholders for LUNs but for me files were just perfect - easy to move and control.
Next enable the iscsitarget in the default configuration file - modify the /etc/default/iscsitarget file's content so that it matches the one below:
# cat /etc/default/iscsitarget
ISCSITARGET_ENABLE=true
Start the iscsitarget service:
Ok, that's it - the iSCSI should be configured to publish two LUNs (storagelun0 and storagelun1) from the /luns directory. Next step is to configure the client machines.
iSCSI Client- CentOS 6.0 on kvm
First of all check if the required software is installed: iscsi-initiator-utils (in my case it was). If it is not then install it from the standard repository as follows:
Start and enable the iscsi and multipathd service during boot of the system:
Now you can perform the discovery of the available iSCSI targets:
Next connect to the target. There two options you either specify the target (name, IP) and in that case the tooling will login to only this target or you leave it unspecified and you will be connected to all targets. In this manual I will use the first approach.
Ok, now let's get to the multipath configuration. First of all copy the example configuration file to the /etc directory and restart the multipathd daemon:
Ok, now let us configure the multipath daemon so that the device is always available as an alias (e.g. ha-mediate under /dev/mapper/ha-mediate). Add the following section to the /etc/multipath.conf file and restart the multipathd daemon:
[root@localhost ~]# cat /etc/multipath.conf
##
## This is a template multipath-tools configuration file
## Uncomment the lines relevent to your environment
##
multipaths {
multipath {
wwid 149455400000000006c756e30000000000000000000000000
alias ha-mediate
path_grouping_policy multibus
path_selector "round-robin 0"
failback manual
rr_weight priorities
no_path_retry 5
rr_min_io 100
}
}
[root@localhost ~]# service multipathd restart
As you see now the device is available under it's alias - in my case ha-mediate. So that's it - now you can create a filesystem on a device, mount it and start using it ;)
If you mount the iSCSI target only from one server you can create a cluster unaware filesystem like etx3, ext4 (example below). However for granting access from multiple servers a cluster-aware filesystem has to be created.
 |
| Figure 1 iSCSI client-server architecture |
iSCSI Server configuration - Ubuntu
First of all you need to install the iscsitarget software - it is available in the standard Ubuntu repo - as below:
# apt-get install iscsitarget
Reading package lists... Done
Building dependency tree
Reading state information... Done
Suggested packages:
iscsitarget-source iscsitarget-dkms
Recommended packages:
iscsitarget-module
The following NEW packages will be installed:
iscsitarget
0 upgraded, 1 newly installed, 0 to remove and 0 not upgraded.
Need to get 78.6 kB of archives.
After this operation, 291 kB of additional disk space will be used.
Get:1 http://us.archive.ubuntu.com/ubuntu/ natty/universe iscsitarget amd64 1.4.20.2-1ubuntu1 [78.6 kB]
Fetched 78.6 kB in 0s (128 kB/s)
Selecting previously deselected package iscsitarget.
(Reading database ... 315227 files and directories currently installed.)
Unpacking iscsitarget (from .../iscsitarget_1.4.20.2-1ubuntu1_amd64.deb) ...
Processing triggers for ureadahead ...
ureadahead will be reprofiled on next reboot
Processing triggers for man-db ...
Setting up iscsitarget (1.4.20.2-1ubuntu1) ...
* iscsitarget not enabled in "/etc/default/iscsitarget", not starting...
Define the LUNs in the configuration file as follows (red colour marks the location of the LUNs):
# vim /etc/iet/ietd.conf
...
Target ubuntu.mediate:storage.sys1
Lun 0 Path=/luns/storagelun0,Type=fileio,ScsiId=lun0,ScsiSN=lun0
Lun 1 Path=/luns/storagelun1,Type=fileio,ScsiID=lun1,ScsiSN=lun
Lun 0 Path=/luns/storagelun0,Type=fileio,ScsiId=lun0,ScsiSN=lun0
Lun 1 Path=/luns/storagelun1,Type=fileio,ScsiID=lun1,ScsiSN=lun
Create the files that will represent the LUNs. One can also use devices (e.g. USB stick) as placeholders for LUNs but for me files were just perfect - easy to move and control.
# cd /luns/
krychu@krystianek:/luns$ sudo dd if=/dev/zero of=storagelun0 count=0 obs=1 seek=10G
0+0 records in
0+0 records out
0 bytes (0 B) copied, 9.01e-06 s, 0.0 kB/s
krychu@krystianek:/luns$ ls -latr
total 8
drwxr-xr-x 26 root root 4096 2011-10-15 10:39 ..
-rw-r--r-- 1 root root 10737418240 2011-10-15 10:40 storagelun0
drwxr-xr-x 2 root root 4096 2011-10-15 10:40 .
krychu@krystianek:/luns$ ls -lh
total 0
-rw-r--r-- 1 root root 10G 2011-10-15 10:40 storagelun0
krychu@krystianek:/luns$ sudo dd if=/dev/zero of=storagelun1 count=0 obs=1 seek=1G
0+0 records in
0+0 records out
0 bytes (0 B) copied, 1.285e-05 s, 0.0 kB/s
Next enable the iscsitarget in the default configuration file - modify the /etc/default/iscsitarget file's content so that it matches the one below:
# cat /etc/default/iscsitarget
ISCSITARGET_ENABLE=true
Start the iscsitarget service:
# service iscsitarget start
* Starting iSCSI enterprise target service [ OK ]
[ OK ]
Ok, that's it - the iSCSI should be configured to publish two LUNs (storagelun0 and storagelun1) from the /luns directory. Next step is to configure the client machines.
iSCSI Client- CentOS 6.0 on kvm
First of all check if the required software is installed: iscsi-initiator-utils (in my case it was). If it is not then install it from the standard repository as follows:
[root@localhost ~]# yum install iscsi-initiator-utils
...
Start and enable the iscsi and multipathd service during boot of the system:
[root@localhost ~]# service iscsi start
[root@localhost ~]# chkconfig --list iscsi
iscsi 0:off 1:off 2:on 3:on 4:on 5:on 6:off
[root@localhost ~]# chkconfig --list multipathd
multipathd 0:off 1:off 2:off 3:off 4:off 5:off 6:off
[root@localhost ~]# chkconfig --add multipathd
[root@localhost ~]# chkconfig --list multipathd
multipathd 0:off 1:off 2:off 3:off 4:off 5:off 6:off
[root@localhost ~]# chkconfig multipathd on
[root@localhost ~]# service multipathd start
Starting multipathd daemon: [ OK ]
Now you can perform the discovery of the available iSCSI targets:
[root@localhost ~]# iscsiadm -m discovery -t st -p 192.168.122.1:3260
192.168.122.1:3260,1 ubuntu.mediate:storage.sys1
192.168.1.133:3260,1 ubuntu.mediate:storage.sys1
192.168.100.1:3260,1 ubuntu.mediate:storage.sys1
192.168.101.1:3260,1 ubuntu.mediate:storage.sys1
Next connect to the target. There two options you either specify the target (name, IP) and in that case the tooling will login to only this target or you leave it unspecified and you will be connected to all targets. In this manual I will use the first approach.
[root@localhost ~]# iscsiadm -m node -l -T ubuntu.mediate:storage.sys1 -p 192.168.122.1:3260
Logging in to [iface: default, target: ubuntu.mediate:storage.sys1, portal: 192.168.122.1,3260]
Login to [iface: default, target: ubuntu.mediate:storage.sys1, portal: 192.168.122.1,3260] successful.
Ok, now let's get to the multipath configuration. First of all copy the example configuration file to the /etc directory and restart the multipathd daemon:
[root@localhost ~]# cp /usr/share/doc/device-mapper-multipath-0.4.9/multipath.conf.synthetic /etc/
[root@localhost ~]# multipath -v2
Oct 15 11:01:38 | /lib/udev/scsi_id exitted with 1
Oct 15 11:01:38 | /lib/udev/scsi_id exitted with 1
[root@localhost ~]# multipath -ll
149455400000000006c756e31000000000000000000000000 dm-3 IET,VIRTUAL-DISK
size=1.0G features='0' hwhandler='0' wp=rw
`-+- policy='round-robin 0' prio=1 status=active
`- 6:0:0:1 sdb 8:16 active ready running
149455400000000006c756e30000000000000000000000000 dm-2 IET,VIRTUAL-DISK
size=10G features='0' hwhandler='0' wp=rw
`-+- policy='round-robin 0' prio=1 status=active
`- 6:0:0:0 sda 8:0 active ready running
[root@localhost ~]# ls -l /dev/mapper/total 0
lrwxrwxrwx 1 root root 7 Oct 15 11:01 149455400000000006c756e30000000000000000000000000 -> ../dm-2
lrwxrwxrwx 1 root root 7 Oct 15 11:01 149455400000000006c756e31000000000000000000000000 -> ../dm-3
crw-rw---- 1 root root 10, 58 Oct 15 09:52 control
lrwxrwxrwx 1 root root 7 Oct 15 09:52 vg_centos6hosta-lv_root -> ../dm-0
lrwxrwxrwx 1 root root 7 Oct 15 09:52 vg_centos6hosta-lv_swap -> ../dm-1
Ok, now let us configure the multipath daemon so that the device is always available as an alias (e.g. ha-mediate under /dev/mapper/ha-mediate). Add the following section to the /etc/multipath.conf file and restart the multipathd daemon:
[root@localhost ~]# cat /etc/multipath.conf
##
## This is a template multipath-tools configuration file
## Uncomment the lines relevent to your environment
##
multipaths {
multipath {
wwid 149455400000000006c756e30000000000000000000000000
alias ha-mediate
path_grouping_policy multibus
path_selector "round-robin 0"
failback manual
rr_weight priorities
no_path_retry 5
rr_min_io 100
}
}
[root@localhost ~]# service multipathd restart
Stopping multipathd daemon: [ OK ]
Starting multipathd daemon: [ OK ]
[root@localhost ~]# multipath -ll
149455400000000006c756e31000000000000000000000000 dm-3 IET,VIRTUAL-DISK
size=1.0G features='0' hwhandler='0' wp=rw
`-+- policy='round-robin 0' prio=1 status=active
`- 6:0:0:1 sdb 8:16 active ready running
ha-mediate (149455400000000006c756e30000000000000000000000000) dm-2 IET,VIRTUAL-DISK
size=10G features='1 queue_if_no_path' hwhandler='0' wp=rw
`-+- policy='round-robin 0' prio=1 status=active
`- 6:0:0:0 sda 8:0 active ready running
[root@localhost ~]# ls -l /dev/mapper/
total 0
lrwxrwxrwx 1 root root 7 Oct 15 11:05 149455400000000006c756e31000000000000000000000000 -> ../dm-3
crw-rw---- 1 root root 10, 58 Oct 15 09:52 control
lrwxrwxrwx 1 root root 7 Oct 15 11:05 ha-mediate -> ../dm-2
lrwxrwxrwx 1 root root 7 Oct 15 09:52 vg_centos6hosta-lv_root -> ../dm-0
lrwxrwxrwx 1 root root 7 Oct 15 09:52 vg_centos6hosta-lv_swap -> ../dm-1
As you see now the device is available under it's alias - in my case ha-mediate. So that's it - now you can create a filesystem on a device, mount it and start using it ;)
If you mount the iSCSI target only from one server you can create a cluster unaware filesystem like etx3, ext4 (example below). However for granting access from multiple servers a cluster-aware filesystem has to be created.
[root@localhost ~]# mkfs.ext4 /dev/mapper/ha-mediate
mke2fs 1.41.12 (17-May-2010)
Filesystem label=
OS type: Linux
Block size=4096 (log=2)
Fragment size=4096 (log=2)
Stride=0 blocks, Stripe width=0 blocks
655360 inodes, 2621440 blocks
131072 blocks (5.00%) reserved for the super user
First data block=0
Maximum filesystem blocks=2684354560
80 block groups
32768 blocks per group, 32768 fragments per group
8192 inodes per group
Superblock backups stored on blocks:
32768, 98304, 163840, 229376, 294912, 819200, 884736, 1605632
Writing inode tables: done
Creating journal (32768 blocks): done
Writing superblocks and filesystem accounting information: done
This filesystem will be automatically checked every 34 mounts or
180 days, whichever comes first. Use tune2fs -c or -i to override.
[root@localhost ~]# mkdir /mnt/tmp
[root@localhost ~]# mount /dev/mapper/ha-mediate /mnt/tmp/
[root@localhost ~]# ls -l /mnt/tmp/
total 16
drwx------ 2 root root 16384 Oct 15 11:06 lost+found
środa, 12 października 2011
Linux: cronjob redundancy and failover with rcron & keepalived)
The solution described in this article is about introducing additional HA features like redundancy and failover to the periodic jobs executed via cron. It means that a periodic job is spread over multiple nodes but only one is executing it. In case of failure of this node another one can take over this task and execute it.
Actually what is interesting this kind of functionality might be provided by the by the combination of the keepalived and rcron (deployment figure presented below). How will it work? The rcron is an enhanced version of cron that first checks the state of the node in a file and only if the node is the master node the job is executed. The state of the node is on the other hand controlled by the keepalived daemon namely only the master node has the active state for the rcron job. In case of master node failure the active state is transferred to the backup node with the highest priority.
That was theory let's check it in practice.
Getting the rcron binary
The rcron is not available in the standard CentOS repo and has to be built from the source. The best way is to install subversion and checkout the latest source tree from the googlecode. Rcron in order to compile requires two additional packages: byacc and flex. You can download the packages from the standard repository. Below one can find the commands to be used to install dependencies and build rcron from source code:
# yum install subversion byacc flex
# svn co http://rcron.googlecode.com/svn/trunk rcron
# cd rcron/
# ./configure
# make
# ./install-sh
# make install
Please repeat the operation on all nodes on which you would like to have the redundant cronjob configured.
Configure keepalived for redundancy and failover
Now as we have the rcron binary available let's get to the keepalived. For the initial configuration of the keepalived please check the previous articles on my blog. For the redundant cron job an additional vrrp instance is to be configured with a special handling of the state for rcron (/var/run/rcron/state file).
Host A's keepalived configuration file (/etc/keepalived/keepalived.conf) should be:
vrrp_instance CRON_1 {
state BACKUP
interface eth0
virtual_router_id 31
priority 99
advert_int 1
authentication {
auth_type PASS
auth_pass 1111
}
notify_backup "/bin/echo passive > /var/run/rcron/state"
notify_master "/bin/echo active > /var/run/rcron/state"
notify_fault "/bin/echo passive > /var/run/rcron/state"
}
Configuring rcron daemon
The configuration of the rcron is based on the examples.
The main configuration file for HostA:
[root@centOS-hostA log]# cat /etc/rcron/rcron.conf
# An arbitrary name
cluster_name = rcron_redundantjobs
# A file containing either the word "active" or the word "passive"
state_file = /var/run/rcron/state
# The default state in case state_file can't be read
default_state = active
syslog_facility = LOG_CRON
syslog_level = LOG_INFO
# We can tune jobs niceness/priorities (see nice(1)).
nice_level = 19
Limitations
RCron together with keepalived could provide the redundancy and failover for the periodic jobs but there are certain limitation described above that have to be taken into account.
Actually what is interesting this kind of functionality might be provided by the by the combination of the keepalived and rcron (deployment figure presented below). How will it work? The rcron is an enhanced version of cron that first checks the state of the node in a file and only if the node is the master node the job is executed. The state of the node is on the other hand controlled by the keepalived daemon namely only the master node has the active state for the rcron job. In case of master node failure the active state is transferred to the backup node with the highest priority.
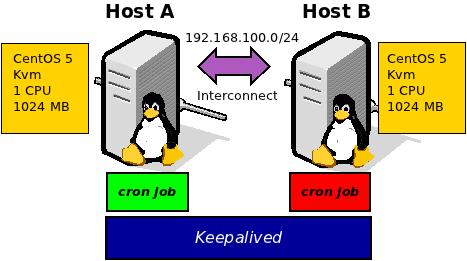 |
| Figure 1 Failover and reduncancy using rcronjob and keepalived |
That was theory let's check it in practice.
Getting the rcron binary
The rcron is not available in the standard CentOS repo and has to be built from the source. The best way is to install subversion and checkout the latest source tree from the googlecode. Rcron in order to compile requires two additional packages: byacc and flex. You can download the packages from the standard repository. Below one can find the commands to be used to install dependencies and build rcron from source code:
# yum install subversion byacc flex
# svn co http://rcron.googlecode.com/svn/trunk rcron
# cd rcron/
# ./configure
# make
# ./install-sh
# make install
Please repeat the operation on all nodes on which you would like to have the redundant cronjob configured.
Configure keepalived for redundancy and failover
Now as we have the rcron binary available let's get to the keepalived. For the initial configuration of the keepalived please check the previous articles on my blog. For the redundant cron job an additional vrrp instance is to be configured with a special handling of the state for rcron (/var/run/rcron/state file).
Host A's keepalived configuration file (/etc/keepalived/keepalived.conf) should be:
vrrp_instance CRON_1 {
state MASTER
interface eth0
virtual_router_id 31
priority 100
advert_int 1
authentication {
auth_type PASS
auth_pass 1111
}
notify_backup "/bin/echo passive > /var/run/rcron/state"
notify_master "/bin/echo active > /var/run/rcron/state"
notify_fault "/bin/echo passive > /var/run/rcron/state"
}
Host B's configuration file (/etc/keepalived/keepalived.conf) should be:
Host B's configuration file (/etc/keepalived/keepalived.conf) should be:
vrrp_instance CRON_1 {
state BACKUP
interface eth0
virtual_router_id 31
priority 99
advert_int 1
authentication {
auth_type PASS
auth_pass 1111
}
notify_backup "/bin/echo passive > /var/run/rcron/state"
notify_master "/bin/echo active > /var/run/rcron/state"
notify_fault "/bin/echo passive > /var/run/rcron/state"
}
After startup of keepalived daemon the state on:
- HostA is active:
[root@centOS-hostA ~]# cat /var/run/rcron/state
active - HostB is passive: [root@centOS-hostB ~]# cat /var/run/rcron/state
passive
The configuration of the rcron is based on the examples.
The main configuration file for HostA:
[root@centOS-hostA log]# cat /etc/rcron/rcron.conf
# An arbitrary name
cluster_name = rcron_redundantjobs
# A file containing either the word "active" or the word "passive"
state_file = /var/run/rcron/state
# The default state in case state_file can't be read
default_state = active
syslog_facility = LOG_CRON
syslog_level = LOG_INFO
# We can tune jobs niceness/priorities (see nice(1)).
nice_level = 19
The main configuration file for HostB:
[root@centOS-hostB]$ cat /etc/rcron/rcron.conf
# An arbitrary name
cluster_name = rcron_redundantjobs
# A file containing either the word "active" or the word "passive"
state_file = /var/run/rcron/state
# The default state in case state_file can't be read
default_state = passive
syslog_facility = LOG_CRON
syslog_level = LOG_INFO
# We can tune jobs niceness/priorities (see nice(1)).
nice_level = 19
The cronjob configuration for both nodes - the rcron job shall be executed in rcron environment as follows (the job is only example, syntax as in cron, this job is configured to be executed every minute - in the output file we will check if the job has been executed or not):
[root@centOS-hostA log]# crontab -l
* * * * * /usr/local/bin/rcron --conf /etc/rcron/rcron.conf echo `date` >> /tmp/output
[root@centOS-hostA log]#
And that is it.
[root@centOS-hostB]$ cat /etc/rcron/rcron.conf
# An arbitrary name
cluster_name = rcron_redundantjobs
# A file containing either the word "active" or the word "passive"
state_file = /var/run/rcron/state
# The default state in case state_file can't be read
default_state = passive
syslog_facility = LOG_CRON
syslog_level = LOG_INFO
# We can tune jobs niceness/priorities (see nice(1)).
nice_level = 19
The cronjob configuration for both nodes - the rcron job shall be executed in rcron environment as follows (the job is only example, syntax as in cron, this job is configured to be executed every minute - in the output file we will check if the job has been executed or not):
[root@centOS-hostA log]# crontab -l
* * * * * /usr/local/bin/rcron --conf /etc/rcron/rcron.conf echo `date` >> /tmp/output
[root@centOS-hostA log]#
Limitations
- Keepalived does not have any hook/notification that would allow to update the status file when the daemon is exiting. It means that there is an additional piece of software needed that would monitor the status of keepalived and update the rcron file if it shuts down. The perfect candidate for that purpose would be the upstart init daemon but unfortunately it is not part of CentOS 5.7 (as soon as I upgrade to CentOS 6 I will try it out)
- RCron is usually not part of any standard repository and have to be compiled from the source. Also there is no support for it which makes it difficult for commercial purposes.
Conlusions
RCron together with keepalived could provide the redundancy and failover for the periodic jobs but there are certain limitation described above that have to be taken into account.
sobota, 1 października 2011
Ubuntu: encrypted private folder for user
Have you ever wanted to protect your sensitive data on your Linux workstation so that nobody (even the root user) would be able to access it without providing the proper password? Recently I had this problem but fortunately it is not that difficult to achieve on Ubuntu box.
I hope that you find the instructions below useful as these were the commands that I used to create/mount and use an encrypted folder. First of all you need to install the ecryptfs-utils package - it is in official repos:
Now by default the encrypted private folder will be automatically mounted during next user logon (if you want to change that behavior) but there is also a possibility to explicitly mount/umount it - below you can find commands/instructions to achieve that:
Disable auto-mount for encrypted private folder
The auto mounting of the encrypted Private folder is controlled by the presence of the empty auto-mount file in the $HOME/.ecryptfs/ directory. If you would like to remove it then just follow the instructions (remove it from this folder):
krychu@krystianek:~$ cd .ecryptfs/
krychu@krystianek:~/.ecryptfs$ ls
auto-mount auto-umount Private.mnt Private.sig wrapped-passphrase
krychu@krystianek:~/.ecryptfs$ rm auto-mount auto-umount
krychu@krystianek:~/.ecryptfs$
After the next login the encrypted Private folder will not be automatically mounted. The user will have to explicitly call the ecryptfs-mount-private command in order to mount it.
I hope that you find the instructions below useful as these were the commands that I used to create/mount and use an encrypted folder. First of all you need to install the ecryptfs-utils package - it is in official repos:
krychu@krystianek:~$ sudo apt-get install ecryptfs-utils
[sudo] password for krychu:
Reading package lists... Done
Building dependency tree
Reading state information... Done
...
[sudo] password for krychu:
Reading package lists... Done
Building dependency tree
Reading state information... Done
...
Next you need to setup the encrypted private folder as follows:
krychu@krystianek:~$ ecryptfs-setup-private
Enter your login passphrase:
Enter your mount passphrase [leave blank to generate one]:
Enter your mount passphrase (again):
************************************************************************
YOU SHOULD RECORD YOUR MOUNT PASSPHRASE AND STORE IT IN A SAFE LOCATION.
ecryptfs-unwrap-passphrase ~/.ecryptfs/wrapped-passphrase
THIS WILL BE REQUIRED IF YOU NEED TO RECOVER YOUR DATA AT A LATER TIME.
************************************************************************
/sbin/restorecon
/sbin/restorecon
Done configuring.
Testing mount/write/umount/read...
Inserted auth tok with sig [cbb481a8ce68b47a] into the user session keyring
Inserted auth tok with sig [d38d63afc3777fe9] into the user session keyring
Inserted auth tok with sig [cbb481a8ce68b47a] into the user session keyring
Inserted auth tok with sig [d38d63afc3777fe9] into the user session keyring
Testing succeeded.
Logout, and log back in to begin using your encrypted directory.
Now by default the encrypted private folder will be automatically mounted during next user logon (if you want to change that behavior) but there is also a possibility to explicitly mount/umount it - below you can find commands/instructions to achieve that:
krychu@krystianek:~$ ecryptfs-mount-private
Enter your login passphrase:
Inserted auth tok with sig [cbb481a8ce68b47a] into the user session keyring
krychu@krystianek:~$ mount
...
Enter your login passphrase:
Inserted auth tok with sig [cbb481a8ce68b47a] into the user session keyring
krychu@krystianek:~$ mount
...
/home/krychu/.Private on /home/krychu/Private type ecryptfs (ecryptfs_check_dev_ruid,ecryptfs_cipher=aes,ecryptfs_key_bytes=16,ecryptfs_unlink_sigs,ecryptfs_sig=cbb481a8ce68b47a,ecryptfs_fnek_sig=d38d63afc3777fe9)
krychu@krystianek:~$ ecryptfs-umount-private
krychu@krystianek:~$ ecryptfs-umount-private
Disable auto-mount for encrypted private folder
The auto mounting of the encrypted Private folder is controlled by the presence of the empty auto-mount file in the $HOME/.ecryptfs/ directory. If you would like to remove it then just follow the instructions (remove it from this folder):
krychu@krystianek:~$ cd .ecryptfs/
krychu@krystianek:~/.ecryptfs$ ls
auto-mount auto-umount Private.mnt Private.sig wrapped-passphrase
krychu@krystianek:~/.ecryptfs$ rm auto-mount auto-umount
krychu@krystianek:~/.ecryptfs$
After the next login the encrypted Private folder will not be automatically mounted. The user will have to explicitly call the ecryptfs-mount-private command in order to mount it.
Subskrybuj:
Posty (Atom)


